Follow our Progress Planting Asparagus in our Raised Bed
We have been planting asparagus in a new bed in our garden. In this series of articles we are sharing the process capturing it in photos and by video hoping that it will either inspire, entertain or educate those with an interest in growing our favourite vegetable. If you missed the first couple of instalments and want to start at the beginning follow this link.
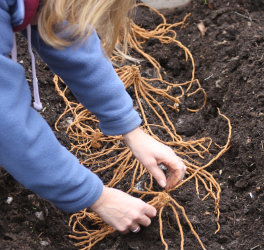
The Asparagus Crowns Arrive
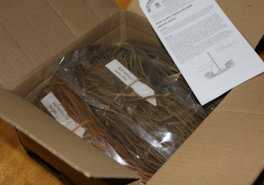 The Asparagus Crowns arrived with instructions on How to plant Fruit Bushes!!! Not much use...
We had to wait pretty impatiently for our crowns to arrive. We had
hoped to plant them late April but it wasn't until the end of the first
week in May that they arrived by which point we were getting a bit
twitchy! Perfect planting days had come and gone......
As soon as the crowns arrived in the post we unpacked the box to have a look at our purchases. We had bought 3 varieties; Mondeo an early variety, Guelph Millennium a later variety and Pacific 2000 because it came in the pack of three!! It was cheaper to buy these 30 plants (10 of each) than a pack of 10 each of the Mondeo and Guelph Millennium..... mad I know.
We had wanted to plant some Stewarts Purple as well but we knew we didn't really have the space.
Its
always interesting to read other peoples directions for How to Plant
Asparagus as everyone has a slightly different take on it. On this
occasion we were disappointed, the box contained instructions for how to
plant fruit bushes... Very handy!!
We had a quick peek then wrapped them up well and popped them in the garage which is pretty cool and dark overnight ready to plant next day.
Good Conditions for Planting Asparagus
The basic principals of how to plant asparagus are shared with the
planting of other plants, not too hot, not too cold, not too dry, not
too wet.... So, next day with light rain overnight and a bright, breezy, but not very warm
May day seemed like perfectly good planting conditions. The soil was dry
on the surface but nicely damp underneath the top layer.
Armed with a spade and some superphosphate we had all we needed for some planting. The only thing slowing us down was the decision to photograph and video the "planting asparagus" process for this site!
After several goes at an introductory chat for the video we were ready to start.
Digging the Trench
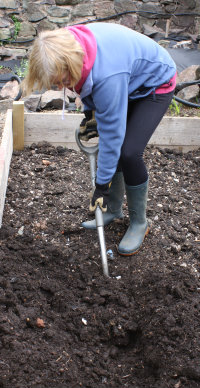 Digging a trench one spade depth by two spades wide
Our bed had not only been dug out by digger (see previous web page)
but had also then been dug over double depth two or three times so the
compost / soil mix was a dream to dig.
We dug a trench about 1 spade depth deep and two spade widths wide. Most instructions talk about 20cm or 9 inches deep and 30cm or 1 foot wide. In practice no one gets out there with a tape measure (do they?). The spade depth and width always seems like a good measure to us. The spades we use are quite small which Sue finds nicely manageable by the way.
We then sprinkled in 200g of superphosphate per 2.7m trench. This is by no means essential but should give the roots a good start.
Next we made a small mound in the middle of each trench by shuffling soil towards the centre from the edges. Instructions again get given in inches of depth but basically when you get your crowns out and you try to spread the roots you just want to be able to spread them out with a bit of an incline to land the top of the crown on. Its obvious when you come to do it.
Unwrapping the Asparagus Crowns for Planting
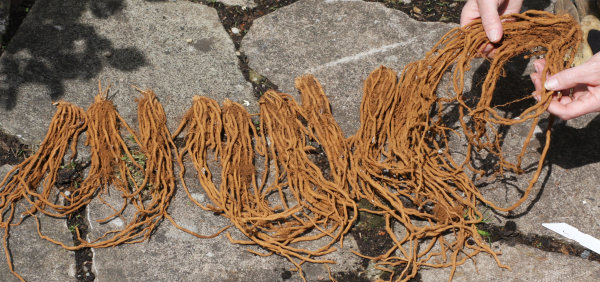 The Mondeo Asparagus Crowns were a bright brown colour and a very good size
We knew we could not use all of the crowns we had, we just didn't have enough space so first we unwrapped the Mondeo crowns and sorted them into size order. We would plant the biggest healthiest crowns first and not put big crowns next to smaller ones where the smaller ones might struggle to compete and not get going as well.
Most of the Mondeo crows were of a very good size. The Guelph Millenium seemed to have long roots but not quite as many and the Pacific 2000 were generally smaller in size. We didn't leave them unwrapped for long not wanting them to dry out at all.
An admission here we had planned on leaving the crowns in water to fully hydrate for a while but amongst the filming and photos we completely forgot, however, they did not seem at all dry so hopefully we got away with it!
The Important bit Planting the Asparagus Crowns
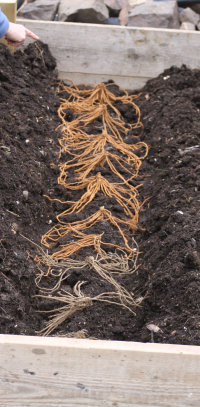 11 Crowns in a row
Its all in the preparation, planting the asparagus really didn't take very long.
We placed the crowns on top of the mound in the middle of the trench splaying the roots out down the side of the mound and out to the sides of the trench. We spaced them about 9 - 12 inches apart. We got 11 plants in each of our 2.7m rows. If we had had a lot of space we would have spread them out a bit further ( the more space the higher the yield per plant and the thicker the spears).
Next we covered them with soil leaving some of the soil to be added over the coming weeks. This way the soil warms up at the level of the crowns sooner.However, the deeper the crowns are planted the bigger the spears. As our raised bed has some depth to take more soil we plan on adding more compost to bury the crowns a bit deeper over the next year or two. For now they are well covered and we will end up another inch or so covered as we use the soil from the sides.
We kept the different varieties together so one row was Mondeo with Pacific 2000 at one end and the other was Guleph Millennium again with Pacific 2000 at one end (the same end).
Watering
Asparagus plants are pretty drought tolerant when matures as their roots go deep. However, young newly planted crowns like any young plant need water to get established. So even though the soil has not been particularly dry we have been watering our plants well.
More on our Asparagus Patch
Keep following our progress as we document our asparagus' progress as it grows.....
See More Pages of Advice on Asparagus Growing
 Gus enjoying Asparagus Season
The easiest way to cook Asparagus!
|
Take look at some of our Interesting and Popular Pages

 Grilled Asparagus
 Asparagus Festivals
 |
Basics of how to cook fresh asparagusstart by looking at How to Cook Asparagus first for some background information on a range of cooking methods. |
Link to us or Contact us |
Ask the Expert
We have our own Asparagus Growing Expert ready to answer any questions we can't answer so ask away. All your asparagus growing questions resolved.


